Ink a Fantasy Character
Are you into drawing fantasy scenes? If yes, you’ll appreciate this pen and ink illustration process.
Bonus if you’re also a fan of Michael Moorcock’s character Elric of Melniboné.
DISCLOSURE: I earn a small commission if you purchase something using my affiliate links. Learn more about the Affiliate Disclosure Terms.
Elric’s Creator
The author, novelist Michael Moorcock a major player in the sci-fi fantasy genre, is the creator of this brooding albino emperor, Elric of Melniboné.
I was surprised by how many visual adaptations I found of this seemingly obscure character.
It turns out that over the years Elric gained cult popularity crossing from novels to:
- role-playing games,
- comics,
- music, and;
- film.

Where to Find Elric
An image search of “Elric of Melniboné” will come up with 100s of stunning works rendered using various mediums, several by legendary artists, notably:
- Michael Whelan
- Mike Mignola
- Yoshitaka Amano
My favourite discovery was a 4-volume graphic novel adaptation by Julien Blondel. The pencils, inks and colours are each done by different artists who rotate from book to book.
The highly-rated series has a commending forward written by celebrated authors including Neil Gaiman and Alan Moore.
“The best graphic adaptation of the story”.
– Michael Moorcock
All this hype had me keen to take a crack at drawing Elric of Melniboné.
For my pen and ink projects, big or small, the first stage always begins with researching.

Stage 1 – Researching Concepts for Elric
In addition to reading parts of the story and admiring all of the art, my research consisted of gathering visual references.
These would later help with sketching concepts for my Elric ink illustration project.
This involved:
- Borrowing library books
- Taking photos of myself in various poses
- Creating folders for reference images
- Printing key references
Over the last 3 years, I’ve collected an extensive image bank of pen and ink illustrations for guidance on line treatments.
I like to study Franklin Booth or Bernie Wrightson‘s pieces for solutions on lighting and shading.
Once all the “parts” were gathered, the next step was to sketch thumbnail concepts.

Stage 2 – Sketching Elric’s Pose
I used the thumbnail stage to plan the:
- Composition
- Values
- Line Treatments
Composition
For planning the composition, I first sketched Elric sitting glumly on his ruby throne.
Then I tried a standing pose with Elric holding his Stormbringer sword. I used the reference pose of myself holding a broomstick to draw his hand position.
The wind blowing in his hair and robes was a visually more interesting composition than the chair pose.

Values
Since this is a dark fantasy scene, shrouding the background in denser tones seemed appropriate.
That way, I could frame Elric with lighter values to emphasize the paleness of his skin like a sinister gleam or mist.

Line Treatment
I decided to rely on line weight variety and stroke direction as the main hatching treatments for the line work.
I like how Franklin Booth rarely uses solid black but rather he knits the lines closer together to give nuance to the shadows. So, I was hoping to achieve similar effects with my artwork.


Stage 3 – Subject Study
Typically, after thumbnails, the next stage would be a subject study to problem-solve line direction or texture gradations.
However, I’ve done several master studies on values lately, including:
Therefore, I was confident to skip the subject study moving on to the underdrawing stage.

Stage 4 – The Underdrawing
For the underdrawing, rather than redoing the pencils from scratch, I traced my sketch onto the Bristol smooth inking paper.
Whenever you’re concerned about losing the spontaneity of your initial concept, it makes sense to trace that sketch. A lot of Pros use a lightbox for that same reason.
If your thumbnail sketch is not the right size for the final artwork, you can scan it or take a photo, size it, and then print it out.
If you don’t have a lightbox, watch this Phoenix Tutorial Video to learn how to use a graphite transfer instead.
I invested extra time at this stage of the drawing mapping out key changes in line direction angles.
Especially for the main character, it was important to address the position and spacing of the inking strokes.

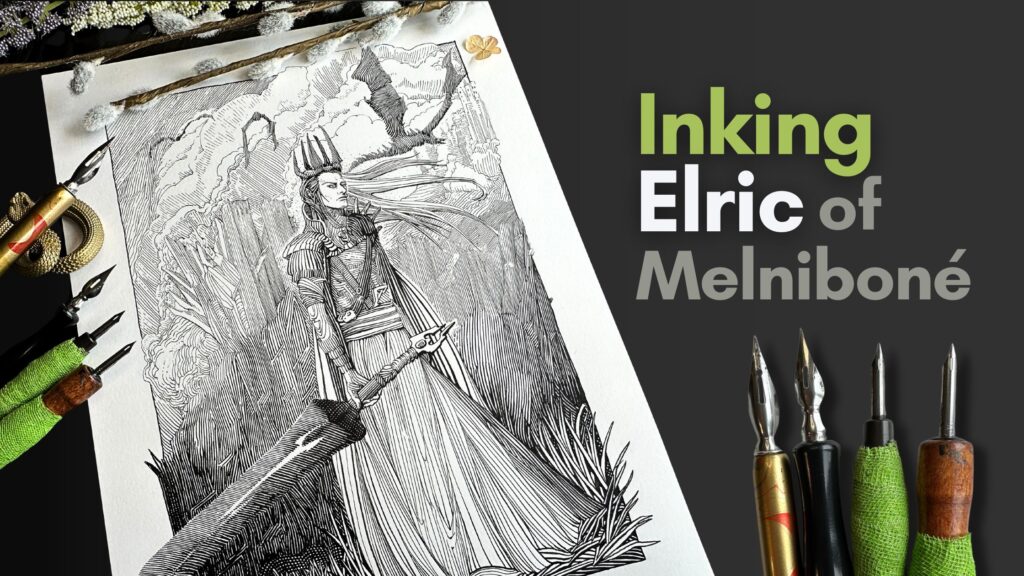
Stage 5 – Inking Elric
For the ink application, I started with Elric’s face as it’s the most important section to get right. I used a Tachikawa 99 nib. It is reliably precise for finer features.
If I cause an unrepairable mistake, I find it less discouraging to redo the underdrawing early on without having gone too far with the inks.

Once the face was done, I switched to a Hunt 102 Crow Quill because of its broad range of line quality, thin-to-thick in a single stroke.
I inked the front-to-back of the picture plane, starting with Stormbringer in the foreground, then rendered the layers of Elric’s costume.
Once the character was inked, I erased the graphite and drew more information in pencil for the foreground and background elements surrounding the main subject.

This sequence is what I follow when inking a piece. It keeps pencil smudges to a minimum.
I used Speedball’s Hunt 513EF and 512 nibs for the thicker lines of the elements closest to the viewer.
To create a sense of depth, the lines got progressively thinner the further into the distance of the picture plane.

Resources
The process described in this article hopefully provided ideas for some steps to follow when inking a favourite fantasy character – or Elric himself.
Although I switched dip pen nib size for line variety, I’ve often inked an entire piece with a single nib.
If you’re curious about how to get started with dip pens for drawing, what to practice for improving with pen and ink, or want a deeper dive into my 5-stage process, check out my dip pen course.
Michael Moorcock’s Elric (Graphic Novels Set)
The Art of Michael Whelan (Artist)

Speedball Hunt 512 bowl nib 2pc
Speedball Super Black India Ink 2oz
Strathmore Bristol Smooth Paper
Swing Arm 5x Magnifying Desk Lamp
CoppertistWu Brass Snake Pen Holder (get 15% OFF with code Gendron15)